

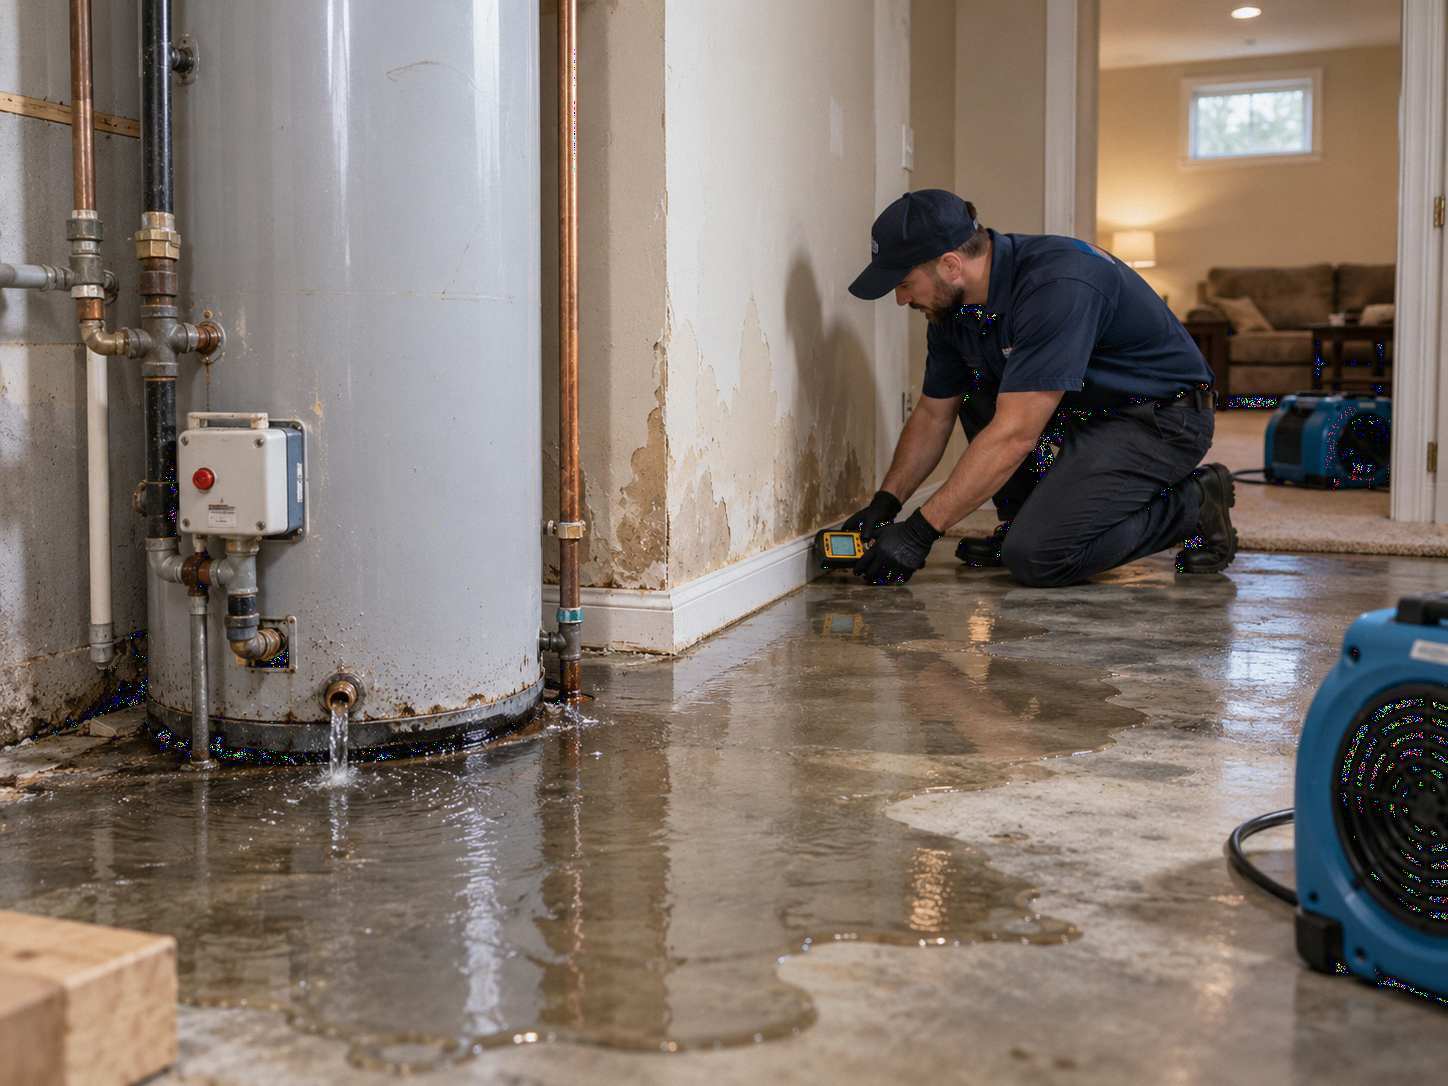
Water heater leak water damage should be treated as two separate problems: the failed water heater and the water that entered the building.
Replacing or repairing the tank solves the equipment problem. It does not automatically dry wet drywall, flooring, carpet padding, baseboards, subflooring, or adjacent rooms.
A sudden tank failure can release enough water to spread well beyond a small utility room. A slower leak around a connection or valve may cause less visible water but remain active long enough to affect porous materials behind the heater.
The correct response is:
Make the area safe → stop additional water when possible → document the loss → remove standing water → determine where moisture traveled → dry and monitor affected materials → begin repairs.
That sequence is the foundation of proper water heater leak water damage restoration.
For a broader overview see
Quick Answer: What Should You Do After a Water Heater Tank Fails?
If a water heater tank has failed or is actively releasing water:
- Stay out of standing water when electrical equipment may be involved.
- Do not touch wet electrical equipment or operate electrical switches while standing in water.
- Stop the incoming water supply when it can be done safely.
- Do not continue operating a damaged water heater.
- Photograph the tank, standing water, walls, flooring, and nearby rooms.
- Remove standing water once the area is safe.
- Check whether moisture moved beneath flooring, behind baseboards, into drywall, or into another room.
- Begin drying before damaged finishes are rebuilt.
Ready.gov warns against touching wet electrical equipment or handling electrical equipment while standing in water because of electrocution risk.
If water is still spreading see
Why Water Heater Leak Water Damage Can Be More Extensive Than It Looks
The amount of water visible when you discover the problem is not always the amount of water that entered the structure.
Water can move through:
- Flooring seams
- Door transitions
- Carpet padding
- Gaps beneath baseboards
- Wall penetrations
- Plumbing openings
- Subfloor joints
- Openings into adjacent rooms
After surface extraction, the floor may look nearly dry while water remains inside porous materials.
That is why water heater leak water damage should be evaluated based on where moisture migrated, not simply on the remaining puddle.
For more information about concealed moisture see
What Causes Leaking Water Heater Damage?
A completely ruptured tank is only one possible source of leaking water heater damage.
Potential sources include:
- Internal tank failure
- Corrosion
- Supply-line failure
- Shutoff-valve leak
- Drain-valve leak
- Plumbing connection above the unit
- Pressure-related discharge
- Nearby pipe failure
- Slow leakage around fittings
The source matters because it must be repaired, but the restoration scope depends on what the released water affected.
Slow Leak vs. Sudden Water Heater Flood
A gradual leak and a sudden water heater flood can produce very different damage patterns.
Slow Leaking Water Heater Damage
A slow leak may create:
- Repeated small puddles
- Stained drywall
- Damp baseboards
- Swollen trim
- Rust staining
- Flooring changes
- Persistent moisture behind the tank
Because there may never be a dramatic flood, homeowners may continue using the space while moisture remains around the unit.
Sudden Water Heater Flood
A sudden tank failure may quickly affect:
- Utility-room flooring
- Basement flooring
- Drywall
- Carpet and padding
- Stored belongings
- Adjoining rooms
- Ceilings below
A large release also increases the chance that water moves under walls before extraction begins.
Water Heater Burst Cleanup: The Correct Sequence
Proper water heater burst cleanup begins with safety and source control.
Step 1: Make the Area Safe
Water heaters are commonly located near electrical outlets, furnaces, laundry equipment, pumps, electrical panels, or other mechanical systems.
Do not walk through standing water when electrical safety is uncertain.
Ready.gov specifically recommends avoiding wet electrical equipment and using a qualified professional when electrical service equipment or the surrounding area is wet.
If a gas odor or another gas-related hazard is suspected, leave the area and use the appropriate utility or emergency service rather than attempting to troubleshoot equipment yourself.
Step 2: Stop Additional Water
If the incoming water supply can be shut off safely, stop it.
Stopping the source limits additional damage, but it does not remove the water already inside the building.
Step 3: Document the Initial Conditions
Before significant cleanup, photograph or record:
- The failed heater
- Apparent leak location
- Standing water
- Wet flooring
- Wet drywall
- Baseboards
- Nearby contents
- Adjoining areas
- Ceiling below if applicable
Step 4: Remove Standing Water
Once the area is safe, standing or extractable water should be removed.
Water that remains on the surface can continue migrating into porous materials.
Step 5: Identify Hidden Moisture
After extraction, evaluate areas where water may have moved:
- Beneath flooring
- Into carpet padding
- Behind baseboards
- Into drywall
- Beneath walls
- Into adjoining rooms
- Through the floor assembly
For immediate-response guidance see
Utility Room Water Damage: Why a Small Room Can Create a Large Loss
Utility room water damage often looks contained because mechanical rooms are usually small.
But water can leave the room through low points and interconnected assemblies.
It may move beneath:
- Door thresholds
- Floating flooring
- Wall plates
- Baseboards
- Carpet
- Mechanical equipment
A water heater installed beside a finished basement, hallway, laundry room, closet, or living area can therefore affect a much larger footprint than the utility room itself.
What Should Be Checked Outside the Utility Room?
Look for changes in:
- Adjacent flooring
- Carpet edges
- Baseboards
- Drywall
- Closets
- Storage rooms
- The opposite side of shared walls
- The ceiling below
A dry-looking threshold does not prove water stopped at the doorway.
Wet Drywall From Water Heater Failure
Wet drywall from water heater leaks is common because tanks are frequently installed close to finished walls.
Drywall can absorb water through its face, lower edge, back side, and openings around plumbing.
Possible signs include:
- Dark staining
- Softness
- Swelling
- Sagging
- Bubbling paint
- Damp baseboards
- Persistent moisture near the floor
Does Wet Drywall Always Need to Be Removed?
No.
The appropriate decision depends on:
- Water source
- Amount of moisture
- Exposure duration
- Physical condition
- Insulation inside the wall
- Accessibility
- Drying potential
When Can Wet Drywall Potentially Remain?
Drywall that remains structurally sound and can be effectively dried may present a different situation from damaged material that has lost integrity.
When Is Removal More Likely?
Removal becomes more relevant when:
- Drywall has softened significantly
- Material is sagging or deteriorated
- Wet insulation is trapped behind the wall
- Contamination is involved
- Access to framing or the cavity is required
Is a Flood Cut Always Required?
No.
A standardized flood cut should not replace evaluation of the actual water source, material condition, and affected height.
Wet Wall Decision Rule
Identify what is wet → evaluate the material → create necessary access → dry and monitor → close the wall only after moisture conditions are addressed.
For detailed drywall guidance see
Water Heater Flood Under Flooring
Flooring can conceal a substantial part of a water heater flood.
A typical floor assembly may include:
- Finished flooring
- Adhesive or underlayment
- Subfloor or concrete
- Structural materials below
Laminate Flooring
Laminate may show:
- Raised seams
- Swollen edges
- Warping
- Core deformation
If the core has permanently swollen, removing moisture may not restore the original dimensions.
LVP and Vinyl
Water-resistant or waterproof finished flooring does not necessarily prevent water from traveling underneath through perimeters, transitions, seams, and penetrations.
The surface may look normal while moisture remains below.
Hardwood Flooring
Wood flooring can react to moisture through:
- Cupping
- Crowning
- Buckling
- Raised boards
- Staining
For hardwood-specific guidance see
Carpet and Padding
Carpet may feel drier at the surface while padding underneath remains wet.
Moisture can also spread through padding farther than the visible edge of the original puddle.
For more information see
What If the Water Heater Is Installed on Concrete?
A concrete utility-room floor can make a loss appear simple because concrete does not swell like laminate, particleboard, or drywall.
However, water can still leave the slab area and affect:
- Drywall
- Wood framing
- Baseboards
- Stored materials
- Adjacent finished flooring
- Wall cavities
A concrete floor therefore does not automatically mean utility room water damage is limited to surface cleanup.
When Is Professional Drying Needed?
Professional drying becomes more useful when water heater leak water damage enters porous or concealed building materials.
Examples include:
- Wet drywall
- Moisture inside wall cavities
- Saturated carpet or padding
- Water beneath flooring
- Wet subflooring
- Multiple affected rooms
- Ceiling damage below
- Unknown leak duration
- Persistent dampness after extraction
EPA notes that commercial firms working with water-damaged buildings commonly use large fans, dehumidifiers, and other equipment to dry wet buildings and materials quickly.
For more information see
Why Household Fans Alone May Not Be Enough
Air movement can help evaporation, but drying involves more than pointing a fan at a wet wall.
As moisture leaves wet materials, it enters the surrounding air.
A complete drying strategy may therefore involve:
- Extraction
- Air movement
- Dehumidification
- Moisture monitoring
- Access to concealed areas
- Adjustments as conditions change
Household fans do not tell you whether water remains beneath flooring, inside insulation, or behind drywall.
Professional drying should be based on the affected materials and actual drying progress rather than on a fixed equipment setup.
Why the First 24–48 Hours Matter
Prompt drying is important after water heater leak water damage.
EPA recommends drying wet or damp materials within approximately 24–48 hours after a leak or spill when possible and identifies moisture control as central to preventing indoor mold growth.
This guidance should not be interpreted as a precise countdown after which mold automatically appears.
Actual mold growth depends on conditions such as:
- Moisture
- Temperature
- Humidity
- Material
- Exposure duration
The useful takeaway is:
Do not wait for visible mold before addressing wet building materials.
Can Water Heater Leak Water Damage Cause Mold?
Potentially, if materials remain damp.
A water heater failure does not automatically mean mold remediation will be necessary.
Concern increases when moisture remains concealed in:
- Drywall
- Wall cavities
- Wood framing
- Carpet padding
- Baseboards
- Stored porous contents
EPA states that indoor mold growth depends on moisture and that controlling the moisture source is the key to controlling mold.
For more information see
For hidden warning signs see
Seven Mistakes After a Water Heater Tank Failure
Mistake 1: Replacing the Heater and Assuming the Job Is Finished
The new water heater stops the source.
It does not dry surrounding materials.
Mistake 2: Removing Only the Visible Puddle
Water may already be underneath flooring or walls.
Mistake 3: Ignoring Wet Drywall
Wet drywall from water heater leaks may remain damp after surface water disappears.
Mistake 4: Running Fans Without Checking Hidden Areas
Airflow cannot resolve moisture in an area that has not been identified.
Mistake 5: Ignoring Adjacent Rooms
Utility room water damage can travel beneath wall plates and transitions.
Mistake 6: Rebuilding Too Soon
New flooring, drywall, baseboards, or paint should not conceal unresolved moisture.
Mistake 7: Waiting for Visible Mold
Moisture should be addressed promptly rather than waiting for visible growth.
DIY Cleanup vs. Professional Water Heater Burst Cleanup
A few drops beneath a connection discovered immediately are different from a failed tank releasing water across a finished basement.
Limited DIY cleanup may be reasonable when the water is immediately controlled and remains entirely on an accessible hard surface.
Professional water heater burst cleanup becomes more relevant when:
- Standing water spreads across the room
- Drywall becomes wet
- Carpet or padding is saturated
- Water enters flooring
- Moisture moves beneath walls
- Several rooms are affected
- A lower ceiling becomes wet
- Leak duration is unknown
- Materials remain damp after cleanup
EPA recommends professional assistance when water damage is extensive or when the water involved is not clean.
For more information see
How Much Does Water Heater Leak Water Damage Restoration Cost?
There is no reliable universal price for water heater leak water damage because restoration scope depends on what became wet.
Cost drivers may include:
- Amount of water
- Affected square footage
- Flooring type
- Wet drywall
- Carpet and padding
- Subfloor involvement
- Number of rooms
- Required access
- Drying requirements
- Reconstruction
A small leak contained on unfinished concrete is very different from a water heater flood affecting finished flooring, drywall, carpet, and several rooms.
For broader cost factors see
For room-specific cost information see
Does Homeowners Insurance Cover Water Heater Leak Water Damage?
Coverage depends on the cause of the loss and the language of the individual policy.
NAIC states that homeowners policies generally cover resulting water damage from a sudden and accidental discharge from a plumbing system, subject to policy conditions, exclusions, and maintenance requirements.
That does not mean every water-heater loss is automatically covered.
Long-term leakage, deterioration, or maintenance-related conditions may be treated differently.
Homeowners should consider documenting:
- The failed heater
- Apparent failure point
- Standing water
- Flooring damage
- Wet drywall
- Damaged contents
- Adjacent rooms
- Mitigation activity
- Estimates
- Invoices
For more information see
For claim documentation see
FAQ: Water Heater Leak Water Damage
1. What should I do immediately after my water heater tank fails?
First, prioritize safety.
Do not stand in water while touching electrical equipment or operating electrical switches. If the wet area includes electrical service equipment or you are uncertain about the electrical condition, use a qualified professional. Ready.gov warns against touching electrical equipment when it is wet or when you are standing in water.
If the incoming water supply can be stopped safely, stop additional water.
Then document the failed heater and surrounding conditions before major cleanup.
Once the area is safe, remove standing water and look beyond the tank itself.
Check:
- Flooring
- Baseboards
- Drywall
- Carpet
- Adjoining rooms
- The ceiling below
Replacing the water heater solves the mechanical failure. Water heater leak water damage inside building materials may still require mitigation and drying.
2. How serious is a water heater flood?
A water heater flood can range from a localized utility-room loss to moisture affecting several rooms or levels.
Severity depends on:
- Volume of released water
- Heater location
- Time before discovery
- Flooring construction
- Wall layout
- Nearby finished spaces
A heater installed on unfinished concrete may create a different reconstruction scope from one installed inside a finished basement or upstairs utility closet.
Even shallow water can move beneath floating flooring or through wall openings.
The appropriate restoration scope should therefore be based on where water traveled rather than solely on the depth of the original puddle.
3. Does wet drywall from a water heater leak always need to be removed?
No.
Wet drywall from water heater leaks should be evaluated based on the actual material condition.
Important factors include:
- Water source
- Amount of moisture
- Exposure duration
- Drywall integrity
- Insulation inside the wall
- Access
- Drying potential
Drywall that remains structurally stable presents a different situation from material that has softened, swollen, sagged, or deteriorated.
The presence of wet insulation or a need to access framing may also affect the restoration decision.
The correct approach is not to automatically remove every wet wall or automatically assume every wall can dry in place.
4. How long does water heater burst cleanup take?
There is no universal timeline for water heater burst cleanup.
A typical loss may involve:
- Source control
- Water extraction
- Moisture assessment
- Material access
- Structural drying
- Monitoring
- Reconstruction
The drying period depends on:
- Amount of water
- Material types
- Indoor humidity
- Flooring system
- Wall involvement
- Accessibility
- Actual drying progress
EPA's 24–48-hour guidance emphasizes beginning prompt drying of wet materials. It should not be interpreted as a guarantee that every building will be completely dry within two days.
Drying decisions should follow the conditions of the affected materials rather than a predetermined number of days.
5. When should I call a water damage restoration company after a leaking water heater?
Professional help becomes more useful when leaking water heater damage extends beyond a small, immediately accessible surface.
Examples include:
- Standing water across a room
- Wet drywall
- Saturated carpet or padding
- Water beneath flooring
- Wet subflooring
- Water beneath walls
- Several affected rooms
- Ceiling damage below
- Unknown leak duration
- Persistent moisture
A professional water-damage response should focus on identifying the complete moisture footprint, extracting water, creating appropriate drying conditions, and monitoring affected materials before reconstruction.
The objective is not simply to make the exposed floor look dry.
The objective is to address the building materials that actually became wet.
Final Takeaway
Water heater leak water damage creates two separate restoration problems:
the failed water heater and the water that escaped into the building.
Replacing the tank solves only the first.
Water heater burst cleanup may require extraction, moisture assessment, drying, monitoring, and repairs.
Leaking water heater damage can extend beneath flooring and into walls even when the original puddle looks limited.
Utility room water damage can migrate into adjoining finished areas.
A water heater flood may affect more than one room or level.
Wet drywall from water heater failures should be evaluated based on moisture, physical condition, wall contents, and drying access.
The correct sequence is:
Make the area safe → stop additional water → document the loss → remove standing water → determine where moisture traveled → dry and monitor affected materials → rebuild only after the moisture problem has been addressed.
That approach helps prevent the most common mistake after a tank failure: replacing the water heater while leaving the water damage behind.

