

Quick Answer: What Is the Water Mitigation Process?
The water mitigation process is the professional cleanup and drying phase after water damages a home or building. The goal is to stop additional damage, remove standing water, dry wet materials, control humidity, and prepare the property for repairs.
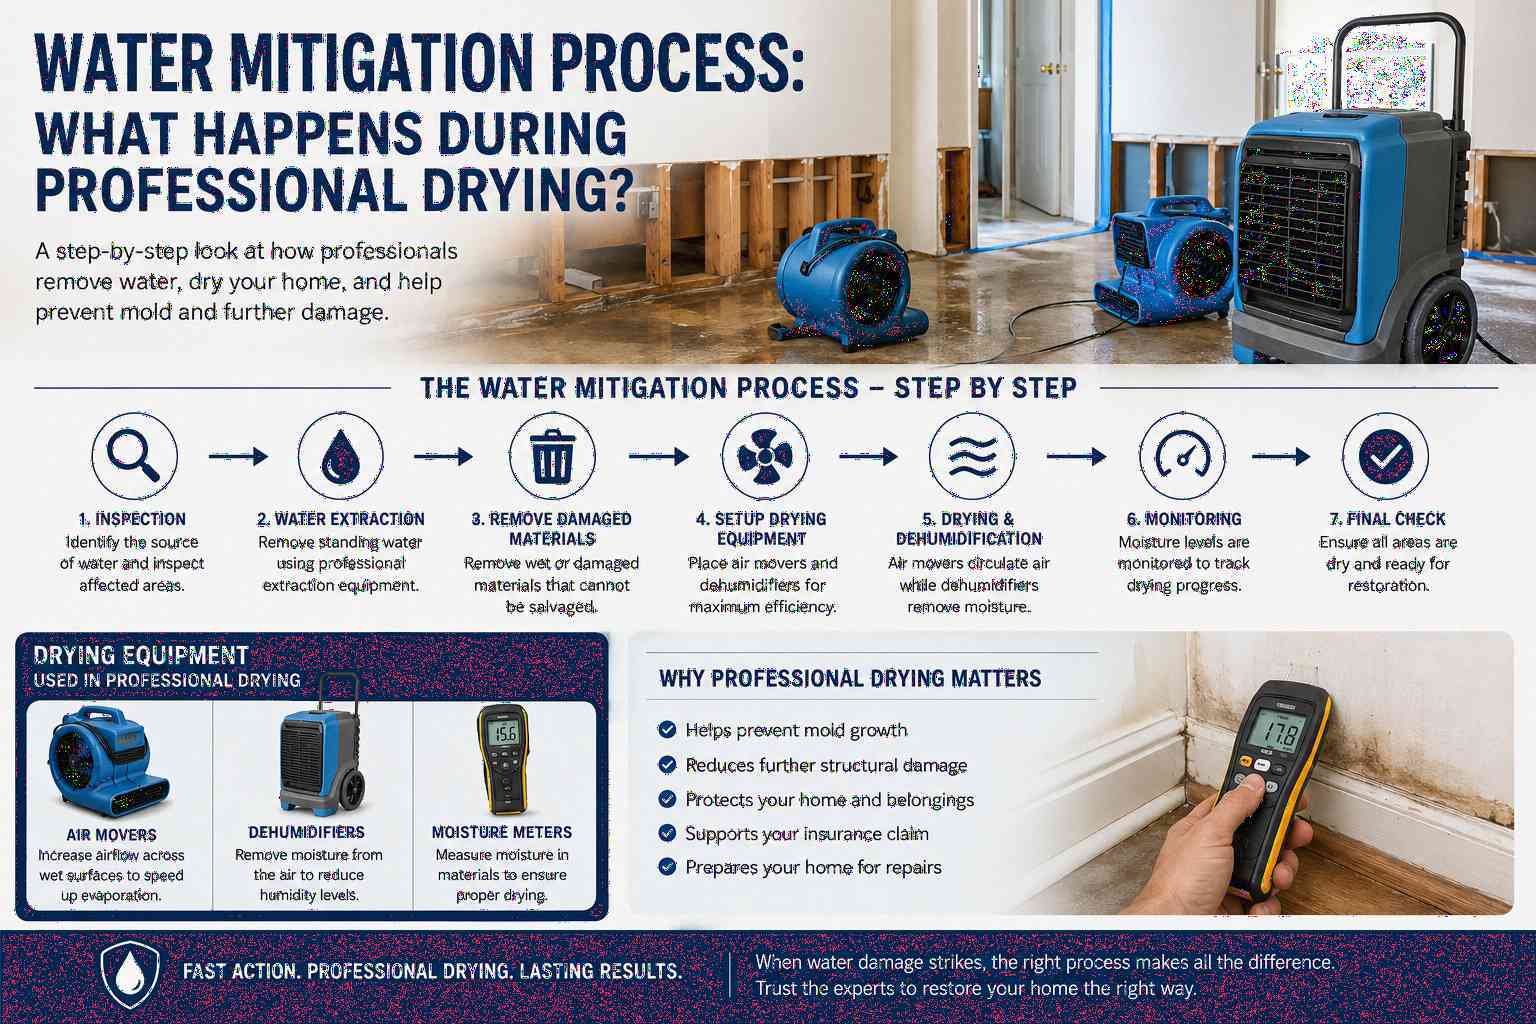
A typical water mitigation process includes safety checks, source control, moisture inspection, water extraction, selective removal of wet materials, setup of drying equipment, placement of dehumidifiers and air movers, moisture monitoring, cleaning, and final dry verification.
Professional drying is not the same as placing a few fans in a wet room. Air movers help move moisture out of wet materials. Dehumidifiers remove that moisture from the air. Moisture meters help confirm whether drywall, wood, flooring, cabinets, and subflooring are actually dry. EPA guidance emphasizes moisture control and recommends drying water-damaged areas and items within 24–48 hours to help prevent mold growth.
For a full homeowner overview, see water damage restoration homeowner guide
What Water Mitigation Means
Water mitigation is the emergency drying and stabilization phase after water damage. It is different from final restoration. Mitigation focuses on reducing the damage and drying the property. Restoration focuses on repairing the home after the structure is dry.
Water mitigation may be needed after:
- Burst pipes
- Appliance leaks
- Water heater leaks
- Toilet overflows
- Sink or tub overflows
- Roof leaks
- HVAC leaks
- Basement water intrusion
- Storm-related water entry
- Water damage from firefighting efforts
The water mitigation process matters because water often moves beyond what the homeowner can see. A floor may look dry on top while moisture remains in the subfloor. Drywall may look normal while water is trapped behind baseboards. Cabinets may hold moisture near the toe kick, back panel, or wall connection.
For urgent water damage situations, see emergency water damage restoration guide
Water Mitigation vs Water Damage Restoration
Water mitigation and water damage restoration are connected, but they are not the same service. Mitigation comes first. Restoration comes after affected materials are dry and ready for repair.
The mitigation phase may include water extraction, drying equipment setup, material removal, cleaning, dehumidification, air movement, and moisture monitoring. The restoration phase may include drywall repair, flooring replacement, trim work, painting, ceiling repair, cabinet repair, and finish repairs.
For repair cost context, see water damage restoration cost guide
Step 1: Safety, Source Control, and Inspection
The first step in the water mitigation process is safety. Before water extraction or drying begins, the affected area should be checked for electrical hazards, sagging ceilings, slippery floors, contaminated water, wet insulation, and visible structural concerns.
Source control is also important. If the water is still flowing, drying cannot begin properly. Depending on the situation, source control may involve shutting off a supply valve, turning off the main water line, stopping an appliance leak, or having a plumbing issue repaired.
A professional inspection may include:
- Identifying the water source
- Checking all affected rooms
- Looking for visible water damage
- Checking flooring, walls, ceilings, trim, cabinets, and baseboards
- Using moisture meters
- Looking for hidden moisture
- Taking photos
- Documenting affected materials
- Explaining urgent water damage cleanup steps
For hidden moisture warning signs, see signs of hidden mold in your home
Why the Water Source Matters
Clean water from a supply line is handled differently than sewage, flood water, or contaminated storm water. The source affects safety precautions, cleanup steps, material removal decisions, and drying strategy.
Why Timing Matters
Wet materials should be addressed quickly. EPA states that the key to mold control is moisture control and recommends drying water-damaged areas and items within 24–48 hours.
Why Materials Matter
Carpet, carpet pad, drywall, insulation, hardwood, cabinets, and subflooring all dry differently.
Simple Rule
The water mitigation process should be based on water source, affected materials, moisture readings, and safety conditions — not guesswork.
Step 2: Water Extraction
Water extraction is the removal of standing water and excess moisture from affected areas. It is one of the most important early water damage cleanup steps because standing water can continue spreading into floors, walls, trim, cabinets, and subflooring.
Water extraction may involve:
- Pumps
- Portable extraction units
- Truck-mounted extraction
- Wet vacuums
- Carpet extraction tools
- Hard-surface extraction tools
- Removal of wet carpet pad when needed
Water extraction does not fully dry the structure. It removes bulk water so professional drying equipment can work more effectively. EPA guidance for wet carpet and backing includes removing water, increasing airflow, and using dehumidification to reduce humidity during drying.
Step 3: Removing Wet or Damaged Materials
Some wet materials can be dried in place. Others may need removal. The decision depends on the water source, material type, saturation level, contamination concerns, drying access, and whether the material can be restored safely.
Materials that may need removal include:
- Wet carpet pad
- Saturated drywall
- Wet insulation
- Damaged baseboards
- Swollen laminate flooring
- Damaged cabinets
- Contaminated porous materials
- Materials with visible mold concerns
Removing wet materials can help open the affected area for drying. It can also reduce trapped moisture. If mold is already suspected, a separate mold remediation process may be needed.
For mold after water damage, see mold after water damage Virginia
Step 4: Drying Equipment Setup
Professional drying depends on controlled equipment setup. The main types of drying equipment used during water mitigation include air movers, dehumidifiers, extraction tools, and moisture meters.
The IICRC S500 standard describes procedures and precautions for professional water damage restoration in residential and commercial properties. The IICRC also describes its standards as recognized guidelines for inspection, cleaning, and restoration work.
In practical terms, equipment should be placed based on room size, affected materials, humidity, temperature, airflow needs, and moisture readings. More equipment is not always better. Correct placement matters.
Step 5: Air Movers and Airflow
Air movers are designed to create directed airflow across wet surfaces. They are not the same as standard household fans. Air movers help moisture evaporate from wet materials so dehumidifiers can remove that moisture from the air.
Air movers may be placed near:
- Wet drywall
- Baseboards
- Carpet
- Flooring
- Cabinets
- Ceiling areas
- Wall cavities
- Tight spaces
- Wet subflooring
Airflow should be controlled. Too little airflow can slow drying. Too much airflow in the wrong situation can move dust or contaminants. If contaminated water or mold concerns are present, the drying plan may need additional controls, selective removal, or separate cleaning steps.
Step 6: Dehumidifiers and Moisture Control
Dehumidifiers remove moisture from the air during the water mitigation process. This matters because moisture that evaporates from wet materials must go somewhere. Without dehumidification, humidity can stay high and drying can slow down.
Dehumidifiers help control:
- Relative humidity
- Indoor moisture load
- Condensation risk
- Drying conditions
- Secondary moisture movement
- Structural drying progress
EPA guidance notes that dehumidifiers can reduce room humidity while fans can accelerate drying. In professional drying, air movers and dehumidifiers work together. Air movers help release moisture from materials. Dehumidifiers remove that moisture from the air.
Step 7: Moisture Monitoring
Moisture monitoring is what separates professional drying from guesswork. A wall, floor, or cabinet may feel dry on the surface while moisture remains inside or behind it.
A contractor may monitor:
- Drywall moisture
- Wood moisture
- Subfloor moisture
- Cabinet moisture
- Relative humidity
- Temperature
- Equipment performance
- Drying progress
Moisture readings help determine whether equipment should stay in place, be moved, adjusted, or removed. They also help show when repairs can begin.
Step 8: Water Damage Cleanup Steps
The water damage cleanup steps depend on the source of water and the materials affected. Clean water from a supply line is handled differently than sewage, flood water, or contaminated backup.
Common cleanup work may include debris removal, surface cleaning, disposal of unsalvageable materials, odor control, and preparation for repair. If the water source is contaminated, cleanup may require additional safety precautions, disposal steps, and selective demolition.
For mold prevention guidance, see how to prevent mold growth Northern Virginia
Step 9: Final Dry Check Before Repairs
Repairs should usually wait until affected materials are dry. If new drywall, flooring, trim, cabinets, or paint are installed over damp materials, moisture can remain trapped.
A final dry check may include:
- Moisture meter readings
- Humidity readings
- Visual inspection
- Equipment removal decision
- Repair readiness notes
- Updated documentation
This step matters because the restoration phase depends on the structure being ready. Drying first helps reduce the chance of hidden moisture, odors, material failure, and mold concerns.
Water Mitigation and Insurance Documentation
A water mitigation contractor may provide documentation for an insurance claim. The contractor does not decide coverage, but documentation can help explain the damage, the affected materials, and the work performed.
Useful documentation may include:
- Photos
- Moisture readings
- Equipment logs
- Affected room notes
- Demolition notes
- Material removal notes
- Drying progress notes
- Repair estimate
- Invoices
For claim preparation, see water damage insurance claim help
For coverage questions, see does insurance cover water damage restoration
Mold Concerns During the Water Mitigation Process
Mold risk is one reason the water mitigation process should not be delayed. EPA guidance says mold will generally not grow in most cases if wet or damp materials are dried within 24–48 hours after a leak or spill.
Mold concerns may increase when:
- Water sits too long
- Materials stay damp
- Insulation is wet
- Drywall remains saturated
- Humidity stays high
- Airflow is poor
- Moisture is hidden behind walls
- Cleanup is delayed
For mold remediation details, see what is mold remediation step by step process
For mold-related insurance questions, see does insurance cover mold remediation Virginia
For mold health concerns, see is black mold dangerous health risks
Common Mistakes During Water Mitigation
Many homeowners try to dry water damage with towels, open windows, or household fans. That may help with very small surface moisture, but it may not address trapped moisture inside building materials.
Mistakes to Avoid
- Waiting too long to start drying
- Using only household fans
- Ignoring wet carpet pad
- Painting over water stains
- Installing flooring over damp subflooring
- Removing materials without photos
- Throwing away damaged items too soon
- Turning off drying equipment early
- Assuming surfaces are dry because they look dry
- Ignoring musty odors
Professional drying is important because water often moves behind visible surfaces. The room may look clean while moisture remains in flooring, wall cavities, cabinets, or insulation.
Local Water Damage and Mold Resources
Water mitigation often connects with water damage restoration, insurance documentation, mold prevention, and mold remediation.
FAQ: Water Mitigation Process
1. What is the water mitigation process?
The water mitigation process is the professional cleanup and drying phase after water damages a home or building. It usually starts with safety checks, source control, and moisture inspection. Then the contractor removes standing water, removes damaged wet materials when needed, sets drying equipment, monitors moisture, cleans affected areas, and confirms dryness before repairs begin.
The purpose of water mitigation is to reduce additional damage. It is not the same as final restoration. Mitigation focuses on drying and stabilizing the property. Restoration focuses on rebuilding damaged drywall, flooring, trim, ceilings, cabinets, and finishes after drying is complete.
2. What is water extraction during water mitigation?
Water extraction is the removal of standing water and excess moisture from the affected area. It may involve pumps, wet vacuums, extraction units, carpet extraction tools, and hard-surface extraction tools.
Water extraction is important because standing water can continue spreading into walls, floors, subflooring, cabinets, baseboards, and insulation. However, extraction alone does not fully dry the property. After extraction, professional drying equipment is usually needed to remove moisture from building materials and indoor air.
3. Why are air movers and dehumidifiers used together?
Air movers and dehumidifiers work together during professional drying. Air movers push air across wet materials and help moisture evaporate from surfaces. Dehumidifiers remove moisture from the air so humidity does not stay elevated.
If air movers are used without proper dehumidification, moisture may stay in the indoor air and slow the drying process. If dehumidifiers are used without enough airflow, wet materials may dry slowly. A professional drying setup uses both types of equipment based on moisture readings and affected materials.
4. How long does professional drying take?
Drying time depends on the amount of water, the materials affected, the water source, humidity, temperature, airflow, equipment placement, and how quickly the water mitigation process begins. Carpet, drywall, wood, insulation, cabinets, and subflooring all dry differently.
A contractor should not rely only on appearance. A surface can look dry while moisture remains inside or behind it. Moisture readings help confirm whether materials are dry enough for repairs.
5. What are the main water damage cleanup steps?
The main water damage cleanup steps include stopping the source, inspecting affected areas, extracting water, removing damaged wet materials when needed, setting drying equipment, monitoring moisture, cleaning affected surfaces, and confirming dryness before repair work begins.
If the water source is contaminated, cleanup may require additional safety steps, selective demolition, and disposal of porous materials. If mold is suspected, the project may require a separate mold remediation process.
Final Takeaway
The water mitigation process is the professional drying and cleanup phase after water damage. It is more than water extraction and more than placing fans in a wet room. A complete process includes inspection, source control, moisture readings, extraction, material removal when needed, air movers, dehumidifiers, cleaning, and final dry checks.
Professional drying helps reduce additional damage, supports insurance documentation, and prepares the home for repair. The most important rule is simple: stop the source, remove water, dry affected materials properly, and confirm dryness before rebuilding.

